Minivan Alpinism in Canada

Colin climbing one last bit of mixed chimney on the northwest face. Photo by Ian Welsted.

Despite my best intentions to dedicate myself to becoming a better rock climber, I somehow keep getting distracted by the call of high mountains… This past summer I tried to rock climb in Squamish a fair amount, but found myself returning a few times to the interior ranges of BC – The Canadian Rockies and the Columbia Mountains.

For a North American alpine climber, the Canadian Rockies are a great resource, and I think the best way to describe what makes them a great resource is this: the most severe alpine terrain on the continent that is accessible by minivan. The Cascades are surely the most severe alpine terrain in the contiguous United States, but despite my love for the Cascades I must admit that most of the peaks in the Cascades don’t pass my “truly alpine” test: Do shady aspects stay icy year-round, and do the peaks receive snowfall year-round? The big peaks of the BC Coast Range, such as Mt. Waddington, are more alpine than anything in the Canadian Rockies, but access in the Coast Mountains is notoriously difficult, with most interesting peaks requiring either an expensive helicopter ride or an extremely arduous approach. Of course the majority of North America’s most extreme terrain is in the Yukon and Alaska, but it suffers from the same problem as the BC Coast Range – either expensive plane and helicopter rides, or very long approaches on foot or ski. I think the Canadian Rockies are home to North America’s most extreme terrain that one can access with a minivan and an easy hike. The rock quality in the Canadian Rockies is notoriously poor, but after a bit more experience there this summer I can say that it starts to seem much more reasonable once you get accustomed to it a bit. And a very nice bonus is that when mixed climbing on limestone your ice tool picks and crampon points seem to stay sharp indefinitely!

MT. COLUMBIA

I made the long drive east for the first time this summer in late July, and met up with Canmore local Ian Welsted. We climbed together for our first time on the famous limestone cliff of Yamnuska, hung out in Canmore for a day of bad weather, and then headed up to the Columbia Icefields. During the bad weather it snowed significantly, down to relatively-low elevations (in late July – clearly passing the “truly alpine” test!), and we decided that the North Ridge of Mt. Columbia was our best choice, as its moderate technical difficulty would be reasonable with fresh snow, but it was still an inspiring objective. The North Ridge of Columbia is a long route (about 2,000m tall), on the second-highest peak in the Canadian Rockies, with a long approach, so we would definitely be making good use of the weather window. Of the two standard approach routes for Mt. Columbia’s North Ridge we decided on the long one, over Wooley Shoulder and up the upper Athabasca River Valley – Although a long hike, it would make for a shorter drive, and take us through some spectacular terrain that neither of us had ever visited before.

We started hiking at a leisurely hour on July 25, and going over Wooley Shoulder I was pretty stoked to be hiking through fresh snow and seeing fresh water ice in mid summer. On the 26th we hiked down-valley below the impressive north face of Twins Tower, to join the wide open Athabasca River Valley. The Athabasca Valley was very spectacular, but required fording thigh-deep braids of river nearly constantly for a couple hours of hiking. We arrived at a scenic bivy low on Mt. Columbia’s North Ridge late in the day, and just barely managed to find some running water – critical because we hadn’t brought a stove. On the 27th we woke up early and started pounding up the snow and ice slopes that define the lower half of the route, definitely feeling a bit worn out from the two-day approach! About two-thirds of the way up Mt. Columbia’s North Ridge Ian led our only belayed pitch: a section of about M5 that gains the ridge crest from the left side. From here it looked quite difficult and time-consuming to stay on the crest of the ridge, but very easy to traverse to easier terrain to the right, so we unroped and started simul-soloing up the upper northwest face. We didn’t climb the North Ridge proper, but climbing the North Ridge to upper northwest face was definitely the “natural” line, and was really fun simul-soloing up mostly moderate slopes, with occasional steps of AI3 or M3. Bypassing much of the technical difficulties of the North Ridge proper allowed us to reach the summit quite early (around noon I think), and by the time we had finished the long soul-destroying slog across the Columbia Icefield and back to the car I was definitely glad that we had taken the easy way!

Colin crossing Wooley Shoulder in mid-summer conditions! Photo by Ian Welsted.
Colin enjoying his girlfriend's aunt's banana bread. Photo by Ian Welsted.
Colin enjoying his girlfriend’s aunt’s banana bread. Photo by Ian Welsted.
The radical north face of Twins Tower.
Colin at a rest stop of day two of approaching Mt. Columbia. Photo by Ian Welsted.
Colin crossing one of many, many braids of river in the Athabasca Valley, with Mt. Columbia in the distance. Photo by Ian Welsted.
Mt. Columbia from the Athabasca Valley, with the North Ridge just left of centre.
Colin at our scenic bivouac, low on Mt. Columbia's North Ridge. Photo by Ian Welsted.
Colin at our scenic bivouac, low on Mt. Columbia’s North Ridge. Photo by Ian Welsted.
Ian pounding up a snow gully low on Mt. Columbia's North Ridge.
Ian pounding up a snow gully low on Mt. Columbia’s North Ridge.
Ian low on the North Ridge, as the terrain began to get technical.
Colin on the lower part of Mt. Columbia's North Ridge, with the Athabasca Valley behind. Photo by Ian Welsted.
Colin on the lower part of Mt. Columbia’s North Ridge, with the Athabasca Valley behind. Photo by Ian Welsted.
Ian on the lower part of Mt. Columbia's North Ridge.
Ian on the lower part of Mt. Columbia’s North Ridge.
Ian briefly with the rope on, as we were concerned about avalanche potential.
Ian on a snow arête about halfway up Mt. Columbia's North Ridge.
Ian on a snow arête about halfway up Mt. Columbia’s North Ridge.
Colin halfway up Mt. Columbia's North Ridge. Photo by Ian Welsted.
Colin halfway up Mt. Columbia’s North Ridge. Photo by Ian Welsted.
Ian leading our one belayed pitch - roughly M5.
Ian leading our one belayed pitch – roughly M5.
Ian traversing onto the upper northwest face, with the Athabasca Valley far below.
Ian traversing on the northwest face.
Colin scratching up a bit of WI3 near the top of the northwest face - fresh water ice in late July! Photo by Ian Welsted.
Colin scratching up a bit of WI3 near the top of the northwest face – fresh water ice in late July! Photo by Ian Welsted.
Ian climbing moderate ice runnels on the upper northwest face.
Colin climbing one last bit of mixed chimney on the northwest face. Photo by Ian Welsted.
Ian climbing through a mixed chimney at the top of Mt. Columbia's northwest face.
Ian climbing through a mixed chimney at the top of Mt. Columbia’s northwest face.
Colin trying to figure out which point is the true summit. Photo by Ian Welsted.
On top of the Canadian Rockies second-highest peak, after a super fun climb!
Colin on the soul-destroying slog across the Columbia Icefield. Photo by Ian Welsted.
Colin taking a break from the slog. Photo by Ian Welsted.


MT. ALBERTA

I had one rest day after Mt. Columbia, then my friend Mikey Shaefer came up to join me, and we went straight back over Wooley Shoulder, this time intent on the Northeast Ridge of Mt. Alberta. Mt. Alberta is a really cool mountain in general, and I think the Northeast Ridge deserves to be its classic route – much less serious than the awesome north face, but much more interesting and enjoyable than the Japanese Route. We climbed the Northeast Ridge in one long day on July 30, and I thought it was a great climb. I had heard previous reports that the Northeast Ridge was very loose and dangerous, and I had also heard previous reports that the Northeast Ridge was very solid and easy – I think that neither is true. The Northeast Ridge involves plenty of properly chossy climbing (only someone who hasn’t climbed on granite in years could call it solid!), but all of it is OK, and none of it is dangerous, with a bit of care. Mt. Alberta’s long summit ridge is beautiful, but the descent down the Japanese Route is nasty. While I can imagine it being fun in wintry/mixed conditions, in summer conditions the Japanese Route is surely one of the lowest-quality alpine climbs I’ve ever seen!

Colin crossing Wooley Shoulder, with Mt. Alberta behind. Photo by Mikey Schaefer.
Colin nearing the base of the Northeast Ridge. Photo by Mikey Schaefer.
Mikey climbing up easy choss low on the Northeast Ridge.
Colin climbing easy choss low on the route. Photo by Mikey Schaefer.
Mikey coming up to a belay low on the Northeast Ridge. From here we simul-soloed easy terrain for quite a ways.
Colin on the moderate mid-section of the Northeast Ridge. Photo by Mikey Schaefer.
Colin on the moderate mid-section of the Northeast Ridge, with Twins Tower behind. Photo by Mikey Schaefer.
Colin nearing the upper buttress of the Northeast Ridge. Photo by Mikey Schaefer.
Mikey traversing easy choss near the upper buttress of the Northeast Ridge.
Colin just below the upper buttress, where we roped up again. Photo by Mikey Schaefer.
Mikey leading one of the nicer, more solid pitches on the route.
Colin climbing a pretty solid chimney/dihedral on the upper buttress. Photo by Mikey Schaefer.
Mikey coming up the chimney/dihedral pitch, of course with plenty of choss on the belay ledge!
Looking down a nice crack, high on the upper buttress - probably the most solid pitch on the route.
Looking down a nice crack, high on the upper buttress – probably the most solid pitch on the route.
Colin switching into crampons for the upper Northeast Ridge. Photo by Mikey Schaefer.
Sloppy snow and funky anchors on the upper Northeast Ridge. Photo by Mikey Schaefer.
Sloppy snow on the upper Northeast Ridge.
Mikey climbing up the final section of Mt. Alberta's Northeast Ridge.
Mikey climbing up the final section of Mt. Alberta’s Northeast Ridge.
On top of an awesome mountain! Photo by Mikey Schaefer.
Colin traversing Mt. Alberta's summit ridge, with Twins Tower in the background. Photo by Mikey Schaefer.
Colin traversing Mt. Alberta’s summit ridge, with Twins Tower in the background. Photo by Mikey Schaefer.
Colin traversing Mt. Alberta's summit ridge, with Mt. Columbia in the background. Photo by Mikey Schaefer.
Colin traversing Mt. Alberta’s summit ridge, with Mt. Columbia in the background. Photo by Mikey Schaefer.
Colin traversing Mt. Alberta's summit ridge, with Twins Tower and Mt. Columbia in the background. Photo by Mikey Schaefer.
Colin traversing Mt. Alberta’s summit ridge, with Twins Tower and Mt. Columbia in the background. Photo by Mikey Schaefer.
Colin rigging the first of many sketchy rappels on the Japanese Route. Photo by Mikey Schaefer.
Colin rappelling off a "mushroom" of choss on the Japanese Route. Several rappels were off of these "mushrooms." Photo by Mikey Schaefer.
Colin rappelling off a “mushroom” of choss on the Japanese Route. Several rappels were off of these “mushrooms.” Photo by Mikey Schaefer.


MT. MACDONALD

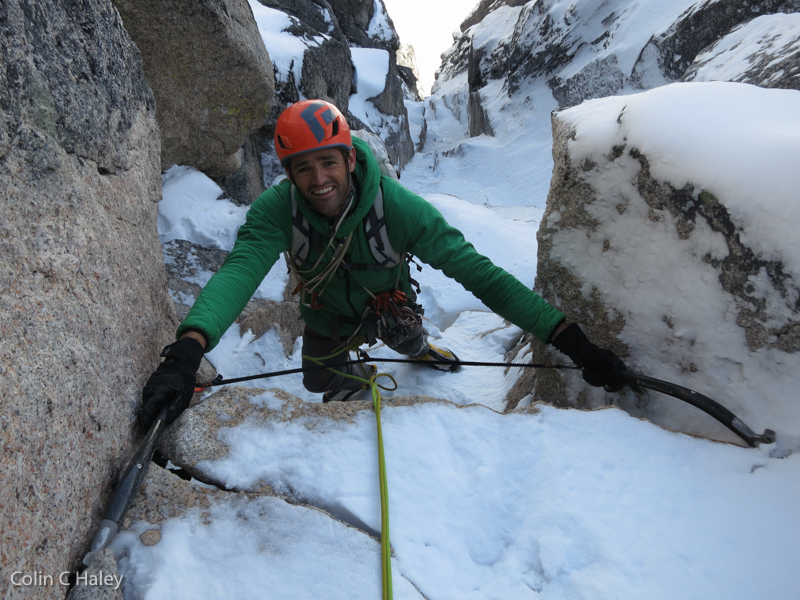
After Mt. Alberta, Mikey and I drove to Rogers Pass for a taste of more solid rock. On August 5th we left the car early and made the short but brushy approach up to the north face of Mt. MacDonald. We had planned to try the Jon Walsh – Colin Moorhead testpiece “Prime Rib,” but accidentally started climbing the wrong buttress! This is pretty funny for two climbers who are generally pretty dialed on route finding. We were quite a ways up by the time we realized we were climbing the wrong buttress, and just kept with it. After joining the Northwest Ridge we simul-climbed for a ways, and then unroped and simul-soloed up seemingly endless 3rd and 4th class terrain to Mt. MacDonald’s summit. The day after we consulted the guidebook and realized that the buttress we had climbed is called “Short Rib,” and is given a rating of 5.10, A1, which is the same difficulty as we encountered. I’m not sure, but I think we may have made the first complete ascent of “Short Rib” to Mt. MacDonald’s summit. Along the Northwest Ridge we got some great views across Mt. MacDonald’s north face proper, and it is quite big and impressive. I will definitely be back at some point for Prime Rib, as well as routes further left on the north face proper, such as Jon Walsh and Bruce Kay’s North Rib route, as well as the Beckey route. While Mt. MacDonald is not as “alpine” as the Canadian Rockies, its north face is surely one of the most accessible faces of its size in North America (I think the face is nearly 1,500m of steep terrain, and the approach from a paved highway takes a couple hours at most).

Mikey arriving at the base of the "Little Face" of Mt. MacDonald, and the wrong buttress!
Mikey arriving at the base of the “Little Face” of Mt. MacDonald, and the wrong buttress!
Colin climbing nice, solid rock on the "Short Rib" route. Photo by Mikey Schaefer.
Colin climbing nice, solid rock on the “Short Rib” route. Photo by Mikey Schaefer.
Mikey leading a steep section on "Short Rib."
Mikey leading a steep section on “Short Rib.”
Colin giving the Freak Power salute, at the junction of "Short Rib" and the Northwest Ridge. Photo by Mikey Schaefer.
Colin giving the Freak Power salute, at the junction of “Short Rib” and the Northwest Ridge. Photo by Mikey Schaefer.
Mikey starting some simul-climbing on Mt. MacDonald's Northwest Ridge.
Mikey starting some simul-climbing on Mt. MacDonald’s Northwest Ridge.
Colin simul-climbing on Mt. MacDonald's Northwest Ridge. Photo by Mikey Schaefer.
Colin simul-climbing on Mt. MacDonald’s Northwest Ridge. Photo by Mikey Schaefer.
Colin simul-soloing higher on the Northwest Ridge. Photo by Mikey Schaefer.
Mikey scrambling high on the Northwest Ridge.
Colin simul-soloing high on the Northwest Ridge. Photo by Mikey Schaefer.
Mikey simul-soloing high on the Northwest Ridge.
Colin simul-soloing high on the Northwest Ridge. Photo by Mikey Schaefer.
Finally on the summit! Mt. Sir Donald in the background. Photo by Mikey Schaefer.


MT. KIDD

I next made the drive out to the Rockies again in early September. I met up with Rockies legend Raphael Slawinski for a day of sport climbing, and then a fun day of alpine rock climbing on the south peak of Mt. Kidd. We made an integral ascent of a classic moderate route called “The Fold.” On this route I was very impressed by the rock quality, which was definitely the highest-quality limestone I have yet climbed on in the Canadian Rockies. The climbing above where most parties descend was admittedly lower quality, but still fun. It was hardly any more difficult technically (5.9), but definitely a bit more serious than the lower portion of the route, as one pitch was certainly R-rated.

Looking up at the south peak of Mt. Kidd. "The Fold" is the prominent, narrow rib on the left. Photo by Raphael Slawinski.
Looking up at the south peak of Mt. Kidd. “The Fold” is the prominent, narrow rib on the left. Photo by Raphael Slawinski.
Raphael simul-climbing up the lower portion of "The Fold."
Raphael simul-climbing up the lower portion of “The Fold.”
Colin simul-climbing up the lower portion of "The Fold." Photo by Raphael Slawinski.
Colin simul-climbing up the lower portion of “The Fold.” Photo by Raphael Slawinski.
Colin scrambing up to the upper buttress of "The Fold." Photo by Raphael Slawinksi.
Colin scrambing up to the upper buttress of “The Fold.” Photo by Raphael Slawinksi.
Colin leading the first pitch of the upper buttress, 5.9R. Photo by Raphael Slawinski.
Raphael climbing on the upper buttress.
Raphael slogging up towards the summit of the south peak of Mt. Kidd.
Raphael scrambling the final section to the summit of Mt. Kidd's south peak.
Raphael scrambling the final section to the summit of Mt. Kidd’s south peak.
Colin scrambling the final section to the summit of Mt. Kidd's south peak. Photo by Raphael Slawinski.
Colin scrambling the final section to the summit of Mt. Kidd’s south peak. Photo by Raphael Slawinski.
Working on my Beckey face on the south peak of Mt. Kidd. Photo by Raphael Slawinski.


MT. TEMPLE, EAST RIDGE SOLO ASCENT

The day after Raphael and I climbed “The Fold,” several days of bad weather rolled into the Rockies, and although it was only September 8, official summer, it turned out to be a very wintery storm. In the town of Canmore about 30cm of snow fell, and supposedly in Calgary about 50cm fell. I spent a few days foolishly wasting away in Canmore, without realizing that the storm had come from the east and that I could’ve found sunny weather not far away at Rogers Pass. On September 12, feeling frustrated from three days of inactivity, I went to climb Mt. Temple on the first day that seemed like somewhat reasonable weather. I soloed the East Ridge with Aemmer Couloir start, which I thought was a classy moderate route. The conditions I encountered made it hard to believe it was still summertime though, with waist-deep snow on lee slopes, and numb fingers walking up the summit ridge, despite wearing two parkas.

Beautiful scenery around Moraine Lake!
Looking down a snowy Aemmer Couloir.
Scrambling up easy, fun mixed terrain in the "Black Towers" of Mt. Temple's East Ridge.
Scrambling up easy, fun mixed terrain in the “Black Towers” of Mt. Temple’s East Ridge.
Looking down at the top of the "Black Towers."
Looking down at the top of the “Black Towers.”
Summertime in Canada, eh? :)
Summertime in Canada, eh? 🙂
Summertime in Canada, eh? :)
Summertime in Canada, eh? 🙂
Summertime in Canada, eh? :)
Summertime in Canada, eh? 🙂


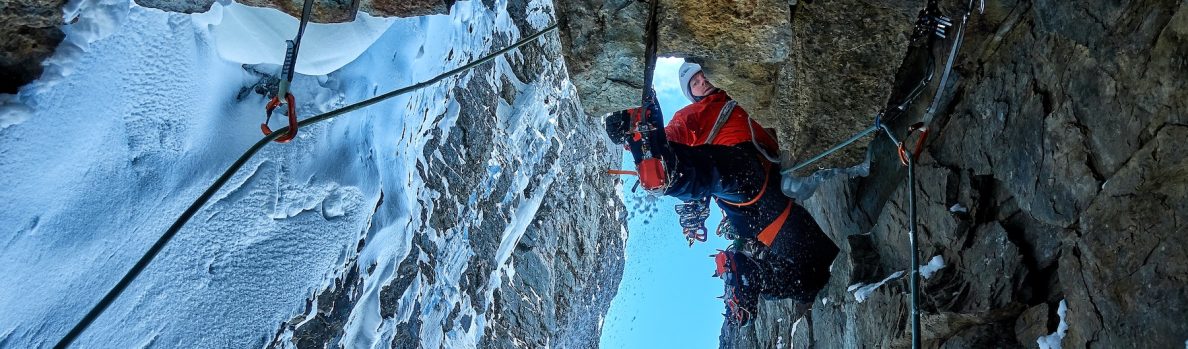
MT. ROBSON, EMPEROR RIDGE SOLO ATTEMPT

Despite having a super fun day of storm-climbing on Mt. Temple, the frustration of three days of inactivity was still palpable, and with a now great weather forecast I took just one rest day, and used it to drive north to Mt. Robson, the well-described “King of the Rockies.” I felt like going big, and on the 14th I made the approach to Berg Lake below Robson’s north aspect, and then scrambled up to the Yellow Band, at the base of the Emperor Ridge. It made for a long approach day, and when I left my bivy early the next morning I could feel that my legs were a bit tired. I planned to solo the Emperor Ridge and descend the standard route on Robson’s south face. The terrain on the lower portion of the Emperor Ridge was pleasantly moderate, and passed easily. Up high the standard route of ascent veers left into an ice gully on the upper-right portion of the Emperor Face (the route “Infinite Patience” joins this ice gully), and this was pleasantly easy as well.

Near the top of the mountain I had planned to traverse below the crest of the upper Emperor Ridge on the west side, as I had done before with Steve House, and as I knew several other parties had done. This traverse below the crest allows one to deal with the ice “gargoyles” for a much shorter distance than along the crest of the ridge proper. However, when I reached the start of this traverse the west face was coming into full sun, and the day was shockingly warm considering how incredibly cold it had been a couple days earlier. It seemed that traversing on the west face would be too risky in terms of rock and ice fall, so I continued along the ridgecrest proper. Although the upper gargoyle ridge has far fewer gargoyles on it than it did a few decades ago, it had about 40cm of fresh snow on it, and did not feel very secure. I persevered for something like 150 meters along the ridgecrest, with some deviations onto the north side (Emperor Face), growing more and more uneasy with the conditions of powdery snow on top of exposed, loose rock. Eventually I stopped and hemmed and hawed. It is of course difficult to say to what degree it was actually dangerous versus my nerves wearing out. I finally decided that I was too scared to continue along the gargoyle ridge. I briefly considered rappelling down to the west face traverse and going that way after all, but realized I was too psychologically exhausted at that point, so I started bailing instead.

While it was psychologically a relief to abandon my attempt on the scary-feeling summit ridge, it was also quite stressful to know I would no longer be descending Robson’s standard route. I had a 60m 5.5mm rope, 2 hexes, 7-8 stoppers, 6 pitons and 2 ice screws. On the Emperor Ridge the climbing had been easy, but not easy enough to easily down-climb, and I decided it wouldn’t be a good option. Although I knew almost nothing about it, I decided that descending the west face was my best option. I made three rappels in the upper portion, but then switched to down-climbing as much as I could. I could tell that there was a significant cliff band near the bottom of the face, just above the Yellow Band, and I wanted to save as much gear as I could for that cliff band, in fear that I would have to make several steep rappels there. The face began to get lower-angled, and I started to make progress rapidly. Eventually I came to a steep cliff band that, although only about 20m high, I couldn’t traverse around. I went to what looked like the best place to set up a rappel, and low-and-behold, I found somebody’s old rappel anchor: a baby-angle piton and a lost-arrow piton, equalized with cord. The two pitons were placed in a crack that was nearly horizontal, but in fact angled about 5 degrees down (toward the outside). I couldn’t place any cams or nuts as backup pieces, as there were no other cracks. I could’ve placed another piton, but I was concerned about conserving my meager rack for lower down. I used the hammer on my ice tool to whack on both of the fixed pitons – One seemed totally solid, and the other went a millimeter or two deeper. I used a sling and a ‘biner to backup the old cord, and rigged my rappel rope. When I started rappelling I did what I always do on marginal rappel anchors – I kept my weight as low as possible, and rappelled smoothly and gingerly. The rappel was short but vertical to overhanging. Below the cliffband was a 30-degree snow-slope, so when I touched down on that I just kept rappelling, because if the rappel is already rigged it is faster than down-climbing, even on such low-angle terrain. I was quickly rappelling down this 30-degree slope when suddenly I lost my balance and nearly tripped. For a moment I didn’t understand what had happened, and then realized in horror that my rappel anchor had ripped out! As I had gone further down the 30-degree snowfield, the angle of pull on the two pitons had become closer and closer to directly out along the axis of the pitons. The terrain I was on was so easy that I didn’t even fall on my ass, but it clearly was a very close call. I consider this to my seventh way-too-close call in the mountains, and of course I am not proud of it. If the rappel anchor had ripped while I was rappelling the cliff band it’s likely I would have survived the fall, but being half-way up Robson’s west face, alone, injured, without any communication device, on a Tuesday in September, would have been a grim situation.

I’ve made three major conclusions about this close call:

1) The direction of pull is VERY significant in the strength of a piton placement.

2) It is ABSOLUTELY worthwhile to keep your weight low and rappel with care on sketchy anchors. In this case it’s not unlikely that this practice saved my life.

3) What I should have done, considering that I was trying to conserve my meager rack, was remove both of the fixed pins and replace them. That would have cost me a few minutes, but no extra gear, and I’m sure I could’ve placed both pins solidly in that case.

The rest of the descent went smoothly, as I was able to find a pretty easy gully through the bottom cliff band. I finally lay down to sleep a little ways below the Yellow Band, but lay awake for quite a while, staring at the stars, listening to my iPod and disappointed in myself for being too risky.


Looking up the Emperor Ridge from low on the route.
Bloody-nose self-portrait low on the Emperor Ridge, with the lower Emperor Face and Berg Lake below.
Looking down from about midway up the Emperor Ridge.
Veering left of the ridgecrest up high, onto the Emperor Face. This is the ice gully where Infinite Patience joins in.
Looking across the Emperor Face.
Looking down the ice gully that Infinite Patience joins.
Looking up the ice gully that Infinite Patience joins.
Looking across the upper west face. The right skyline is the Wishbone Arête.
Looking up at the final gargoyle ridge.
Self-portrait on the sunny and too-hot west face.
Insecure-feeling climbing on the upper ridgecrest.
Looking down the west face, with Kinney Lake below. The highway visible is roughly 3,000 meters below!
Deviating onto the north side of the upper ridge crest.
Looking down the Emperor Face to Berg lake, while deviating onto the north side of the upper ridge crest.
More exposed climbing on the upper ridge.
Looking down a section of the upper Emperor Ridge.
More climbing on the upper Emperor Ridge that was freaking me out.
On the upper Emperor Ridge shortly before I decided I was too scared to continue.
Now I'm too scared.
Now I’m too scared.
My first rappel off of the upper Emperor Ridge.
Looking up the west face from part way down my descent.
The rappel anchor that I ripped out.
The short cliff band that I had just rappelled down.
Looking up the west face from much further down.
This is where I squeezed through the lower cliff band.
Back on the Yellow Band, feeling like I've had an intense day.
Back on the Yellow Band, feeling like I’ve had an intense day.


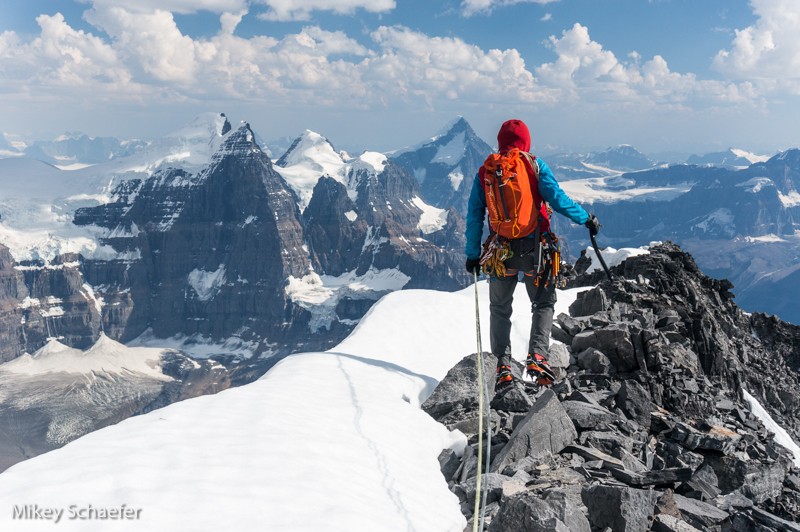
MT. ASSINIBOINE, NORTHEAST RIDGE

My final trip of the summer to BC’s interior mountains was actually just after the end of official summer, with my friend Dylan Johnson. Dylan is a father of a young girl, and a very in-demand architect, so climbing trips with him are always about packing a lot of action into a very short amount of time. This time we left Seattle much-too-late on Sept. 24, and while driving eastwards tried to decide how to best make use of a marginal weather forecast on an extended weekend. By Spokane we had decided that the next day we would try to climb Mt. Assiniboine, “the Matterhorn of the Rockies.” We were on a very tight schedule, so I was in the back of the van trying to organize equipment, while Dylan was rocketing the vehicle through a dark night in southern BC. When I came back to the front passenger seat I said, “Huh, this doesn’t look familiar.” Within a few minutes we realized that we were in Fernie. Whoops. While doing a great job of driving really fast, Dylan had accidentally taken us on a 1.6 hour detour. In Fernie, at 11pm, with very little knowledge of Mt. Assiniboine, and still a long ways to the trailhead, we questioned our objective… In the end we decided to stick with it, and kept driving through the night. We finally reached the trailhead on the Radium side of Mt. Assiniboine early in the morning of the 25th (well, actually, a point a mile or so before the trailhead, when it got a bit advanced for a minivan), finished organizing our gear, and slept for a meager 1.5 hours. We left the car at 7am, after the last few light raindrops had just finished falling.

The approach to Mt. Assiniboine from the Radium side was much shorter and more civilized than we had imagined. The climb itself, up the standard Northeast Ridge, was long, moderate and very scenic, with the occasional section of climbing that required focus.  By the final ridge we were feeling pretty exhausted, from the lack of sleep, lack of acclimatization, and the pretty substantial elevation gain. The weather seemed marginal all day, but fortunately refrained from ever getting actually bad. The descent was tiring as we hadn’t brought a rope and had to carefully downclimb the tricky bits. We returned to the van 14 hours after leaving, feeling pretty knackered. It started raining within an hour of returning to the car, and we felt content, knowing that we had “nailed” the marginal weather window.

Dylan on the approach to Mt. Assiniboine.
Dylan hiking up the glacier below Mt. Assiniboine's NW side.
Dylan hiking up the glacier below Mt. Assiniboine’s NW side.
Dylan low down on Assiniboine's NE Ridge.
Dylan low down on Assiniboine’s NE Ridge.
Colin climbing low on Assiniboine's NE Ridge. Photo by Dylan Johnson.
Colin climbing low on Assiniboine’s NE Ridge. Photo by Dylan Johnson.
Dylan low down on Assiniboine's NE Ridge.
Dylan low down on Assiniboine’s NE Ridge.
Colin climbing low on Assiniboine's NE Ridge. Photo by Dylan Johnson.
Colin climbing low on Assiniboine’s NE Ridge. Photo by Dylan Johnson.
Dylan climbing through what we think was the "Red Band."
Dylan climbing through what we think was the “Red Band.”
Dylan midway up Assiniboine's NE Ridge.
Dylan midway up Assiniboine’s NE Ridge.
Colin climbing through a tricky section midway up Assiniboine's NE Ridge. Photo by Dylan Johnson.
Colin climbing through a tricky section midway up Assiniboine’s NE Ridge. Photo by Dylan Johnson.
Dylan climbing up the same tricky section.
Colin climbing through a tricky little chimney. Photo by Dylan Johnson.
Dylan emerging from the same little chimney.
Colin up high on the Northeast Ridge. Photo by Dylan Johnson.
Dylan climbing high on Assiniboine's NE Ridge.
Dylan climbing high on Assiniboine’s NE Ridge.
Dylan climbing through a tricky section high on the ridge.
Dylan nearing the top of Assiniboine's NE Ridge.
Dylan nearing the top of Assiniboine’s NE Ridge.
Dylan climbing a section of narrow ridge crest.
Colin taking a water break shortly below Assiniboine's summit. Photo by Dylan Johnson.
Colin taking a water break shortly below Assiniboine’s summit. Photo by Dylan Johnson.
Colin climbing a final section of ridge on Assiniboine. Photo by Dylan Johnson.
Looking down the east face, home of the infamous Cheesemond-Dick route.
Dylan feeling the elevation gain up to here.
Dylan on the last few steps to the summit of Assiniboine.
Tired and psyched on top! Photo by Dylan Johnson.
Dylan downclimbing high on Assiniboine's NE Ridge.
Dylan downclimbing high on Assiniboine’s NE Ridge.
Dylan downclimbing high on Assiniboine's NE Ridge.
Dylan downclimbing high on Assiniboine’s NE Ridge.
Dylan downclimbing midway on Assiniboine's NE Ridge.
Dylan downclimbing midway on Assiniboine’s NE Ridge.
Colin downclimbing near the bottom of the NE Ridge. Photo by Dylan Johnson.


SOUTH HOWSER TOWER, THE BIG HOSE

The day after climbing Assiniboine, Dylan and I had a well-timed rest day in Radium, as rain showers blew through. The next day we hiked into the Bugaboos, for both of us our first time going into the Bugs without rockshoes. On the 28th we woke up early and climbed South Howser Tower by the classic ice and mixed route, “The Big Hose.” The route was established solo by Jon Krakauer in the late ’70’s, which I think is a pretty proud solo first ascent. The route is not particularly difficult, and the ratio of approach length to route length is not particularly good (We only climbed 6 pitches, with a bit of simul-climbing), but we both thought it was nonetheless an awesome climb. Since the Bugaboos are normally so busy with people it felt special to be there with no one else around, and with fresh snow making all the peaks prettier. We reached the summit of South Howser by noon, and although we had hoped to romp up Central and North Howser as well, there wasn’t enough time – We had a descent to make, a hike out to do, and a long drive to get done before Dylan’s flight out of Seattle at 6am the next morning! This hectic schedule was executed well, mostly thanks to Dylan’s excellent all-night driving skills.

Dylan approaching the Howser Spires, passing under the south face of Pigeon Spire.
Dylan approaching the snowy Howser Spires. South Howser Tower is the summit on the left.
Dylan hiking up the glacier in the morning, with Bugaboo Spire in the back left and Snowpatch Spire in the back right.
Colin approaching the base of South Howser Tower's NE Face. Photo by Dylan Johnson.
Colin approaching the base of South Howser Tower’s NE Face. Photo by Dylan Johnson.
Colin climbing over the bergschrund, which was about AI4. Photo by Dylan Johnson.
Nice first-light ambiance at the bergschrund. Photo by Dylan Johnson.
Dylan coming up the first pitch of the Big Hose.
Dylan arriving at the first belay.
Colin starting our second pitch. Photo by Dylan Johnson.
Dylan coming up to the second belay.
Dylan starting up the third pitch of the Big Hose.
Dylan at our third belay.
Colin coming up to the third belay. Photo by Dylan Johnson.
Colin starting up our fourth pitch. Photo by Dylan Johnson.
Dylan arriving at the fourth belay.
Dylan leading the fifth pitch, up to the ridgecrest.
Dylan leading the final pitch to the summit of South Howser Tower.
This is in the middle of a 48-hour period in which we talked mostly in fake Punjab accents.
Dylan rappelling down The Big Hose.
Dylan hiking back to the Howser-Pigeon Col, with the northeast faces of the Howser Spires above.